Trader's guide · waytolambo
How to trade with signals
Seven short modules: from reading a signal to the psychology of the long run. Go through them once, then come back to them as a reference before every trade.
Anatomy of a signal
Every signal in the channel is made of four elements. Before you open a position, learn to read all four.
Important: a signal is a ready-made entry with a zone, five take-profits and a stop. You are not trading on guesses, you are trading on probability.
A real signal, line by line
The stop is your insurance. If the price reaches this level, the trade closes by itself and protects your deposit. This is the number you enter in the calculator as the “Stop price”.
Instrument · #SOLUSDT.PSOL
What we trade. The P at the end means a perpetual future. On Hash Hedge look for the same ticker — SOL. Signals cover crypto, gold, silver, oil, indices and stocks.
Direction: LONG (buy)
LONG — we profit when the price rises. SHORT — when it falls.
Entry zone121.58 – 121.06
The range where it pays to open the trade. On a long you can also enter below the zone — that is even better. On a short it's the other way round: you can enter above the zone. If the price has already moved in the profitable direction, don't chase it — place a limit order inside the zone.
Take-profits · Take-profit 1–55 targets
A fifth of the position is closed at each target. The first target is close, the last one is far. Exactly how to close — in module 04.
Stop · Stop-loss118.73
The price at which the trade closes at a loss. It is set right away, together with opening the position.
Risk1%
It isn't in the signal because it never changes: 1% of the account. It means you lose no more than 1% of your deposit if the stop is hit. The calculator works out the size for this risk.
The second type of message: closed by an opposite signal
The trend on the instrument has turned, and a new signal in the opposite direction follows right after this message. If part of the previous position is still open, close it at market. Profit is the result from the middle of the entry zone to the close price, without leverage.
Always check that the instrument in the signal header matches the one you open on the exchange. In this example it is SOL/USDT.
Open the risk management calculator →Risk management and deposit
The trade size is worked out not from “how much to put in”, but from “how much you can lose at most”.
What 1% risk means
1% risk is the most you will lose if the stop is hit. It is not about the size of the trade, but about the possible loss.
The position size is calculated so that even if the trade closes at the stop, the loss is no more than 1% of the account. That is why the trade size can be bigger or smaller than the account, but the maximum loss always stays within 1%.
How much to risk on each challenge
Risk per trade is 1% on any account. Only the dollar amount changes with the challenge size. Getting stopped out is normal — it is part of the system.
Open the risk management calculator →Why use leverage
Leverage lets you hold several trades at once without locking the whole account in one position. And leverage does not increase risk if the size is calculated correctly.
The loss depends on only two things: the position size and the distance from entry to stop. So the size is calculated to lose no more than 1% at the stop — at any leverage.
Opening a position step by step
From a signal in the channel to an open trade on Hash Hedge — three steps.
Calculate the size
Open the calculator, enter your account size, the entry price from the zone, the stop from the signal and 1% risk — and you get the position size.
Open the calculator →Open the position
In your dashboard, on the Accounts page click Trade and select the instrument from the signal. The order panel is on the right.
Margin mode —
Isolated, leverage —5x.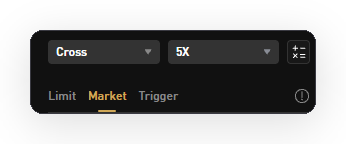
Margin mode and leverage At market — if the price is inside the zone right now: the
Markettab → size from the calculator → Buy / Long or Sell / Short.With a limit order — if the price has left the zone: the
Limittab → a price from the zone → size → the order fills when the price comes back to the level.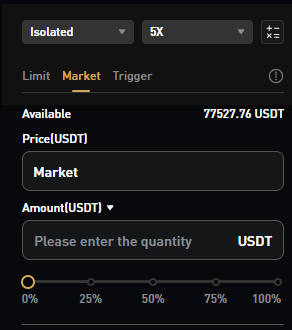
Order panel Don't use the 25% / 50% / 100% slider. It calculates from the account size, not from your risk.
Set the stop and take-profits
Stop. Before you press the button, tick the TP/SL box and enter the stop price from the signal.
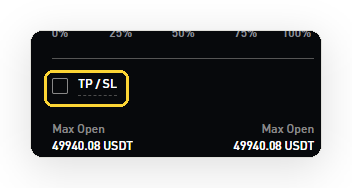
The TP/SL checkbox Take-profits. After entering, open the Positions tab at the bottom, click the pencil in the TP/SL column and switch to the Partial Position tab. Add five levels: the TP1 price with a 20% size, then TP2 with 20% — and so on up to TP5.
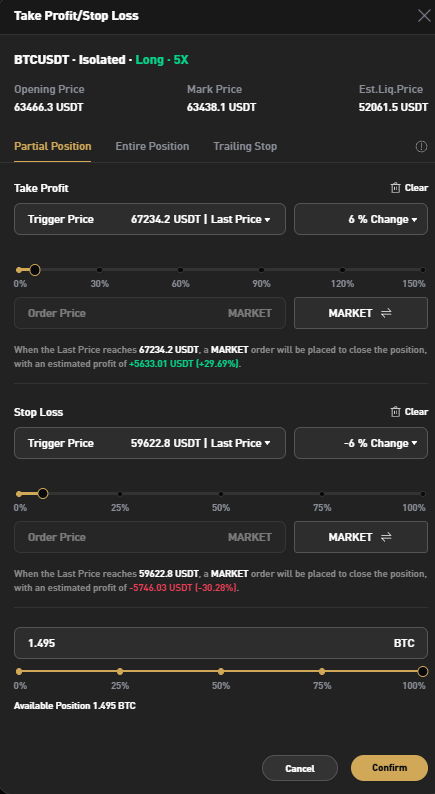
Partial take-profits: Partial Position Check the Positions tab: your numbers should be in the TP/SL columns.

Stop and take-profits in the Positions tab
Now you can open a trade from a signal
All that's left is to get the signals. Access terms are in the bot, it takes a minute.
How to take profit
Five take-profits are no accident. Each one lowers the risk on the rest of the trade.
After TP1 the stop sits at the entry price: part of the profit is already locked in, and if the price turns, the rest closes around zero.
How to move the stop. The Positions tab → the pencil in the TP/SL column → replace the old stop with the entry price.
The main rule
Ideally you don't close the trade by hand: the stop and take-profits are set in advance, everything fires automatically.
If you get the «Closed due to opposite signal» message, close the rest of the position with Close → Market Price. Don't hold a trade against the market. The new signal in the opposite direction is opened at its own levels.
Psychology and discipline
The system works as long as emotions don't break it. This applies to every trader, not only beginners.
A stop is not a failure. It is protection.
Some trades close at the stop or at a small loss on an opposite signal. That is built into the system, it is not a mistakeAbout the long run
5–10 trades is too small a sample to judge a system. The statistics even out over 50–100 trades, and that is where the real result shows.
About the fear of the first trade
Your brain treats real money differently from a demo — that is normal. But putting it off doesn't lower the risk, it only postpones the experience.
01
1% risk — always
Not “usually 1%”, but in every single trade. Especially when it feels like “this one will definitely work”.
02
No more than three trades
No more than 3% risk in the market at once, counting what you have already lost today. Skip the other signals.
03
Don't chase losses
After a series of stops — take a pause, don't increase the size. The market isn't going anywhere, but your account might.
Common obstacles in the first days
If any of this sounds like you — that's normal, everyone goes through it.
I don't understand how to set the stop and take-profits
Go through module 03 again, step by step, with the screenshots in front of you. The stop — with the TP/SL box before pressing the button. The take-profits — after entering, in the Partial Position tab, 20% each.
I'm afraid of losing money
That is exactly what the 1% risk is for: the stop limits in advance how much you can lose in one trade. It isn't “anything can happen”, it is an amount calculated in advance — on a $10,000 account that is $100.
The price has already left the entry zone
Don't chase it. Place a limit order inside the zone: if the price comes back, the trade opens; if not, you've lost nothing. There are plenty of signals, missing one is no big deal.
Several stops in a row — is the system broken?
No. Series of stops are a normal part of the work, they happen to any system. It is judged over 50–100 trades, not five.
Lots of signals arrived at once
That is normal: signals cover dozens of instruments, and several can arrive at the same time. Take no more than three and skip the rest.
Technical problems on the platform
Anything about the terminal, deposits or the account is handled by Hash Hedge support. They answer right in your dashboard.
The Hash Hedge challenge
Where to trade the signals and how the challenge works — in short.
The firm's money
You don't risk your own deposit
You pay a fixed fee and trade the firm's account. You can't lose more than the fee.
80% of profit
The trader's share
Pass the stages and out of every thousand dollars earned on the firm's account, eight hundred are yours.
No rush
No time limit
None of the stages has a deadline. You can trade for as long as you need.
Leverage up to 5x
Crypto and TradFi
Longs and shorts on the same instruments that come in the signals: crypto, gold, silver, oil, indices and stocks.
Stage rules
| Stage 1 | Stage 2 | Trader | |
|---|---|---|---|
| Profit target | 8% | 6% | none |
| Daily loss limit | 5% | 5% | 5% |
| Maximum drawdown | 10% | 8% | 8% |
| Your profit share | — | — | 80% |
At least five trading days per stage.
How to buy a challenge
Get the link in the bot
Press the button below — the bot will send your personal Hash Hedge link and the terms of access to the signals.
Choose the market and account size
Market — Crypto + TradFi: all instruments from the signals trade there. The rules are the same for every size; it makes sense to start with a small first challenge.
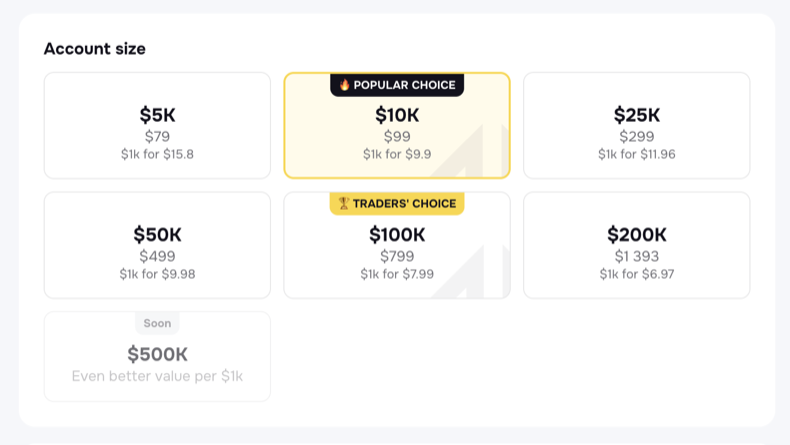
Choosing the account size Pay
Check your order and choose a payment method. After payment the bot will send you an invitation to the signals channel by itself.
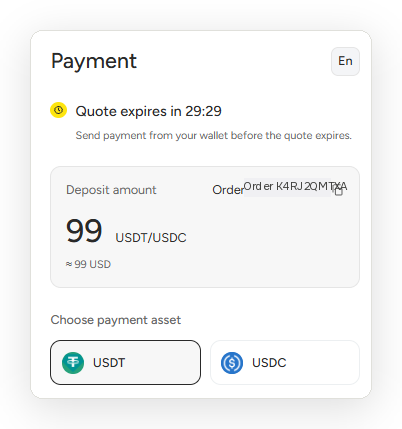
Payment
Only buy through the link from the bot. Otherwise the purchase won't be linked to you, and access to the signals won't open automatically.
Before paying: how to pick the right transfer network →
Cheat sheet
Eight rules for working with a signal
Two minutes to read. Save it and open it before a trade.
Check the instrument.
The ticker in the signal header and on the exchange must match. #SOLUSDT.P is SOL.
Risk — 1% of the account in every trade.
Size = risk amount ÷ distance to the stop. The calculator does it, not the exchange slider.
Enter inside the zone and don't chase the price.
Price inside — at market. Price gone — a limit order inside the zone.
The stop is set together with the entry.
The TP/SL box before pressing the button. A trade without a stop is not a trade by the system.
Five take-profits of 20%.
The Partial Position tab. After TP1 the stop moves to the entry price.
Opposite signal — close the rest.
“Closed due to opposite signal” → Close → Market Price. The new signal opens at its own levels.
No more than three trades at once.
A ceiling of 3% risk, counting what you've already lost today. Skip the other signals.
After a series of stops — pause.
Don't increase the size to win it back. A system is judged over 50–100 trades.
The cheat sheet answers “what to do”. What remains open is “when” — and that is what the signals are for.
How much to buy
Position size isn't chosen, it's calculated. Enter the entry and stop from the signal — the rest is worked out with the formula from module 02.
Long
$0
—
Take-profits, 20% of the position each
—
—
Calculating is half the job. The other half is knowing what to calculate.
Entry, stop and take-profits arrive ready-made every day: crypto, gold, oil, indices and stocks.